Ok, I'm a n00b

. When I want to mod something, I need LOTS of instructions. That's what I've done here. More experienced modders can just scroll down to the pics. Enjoy! wt:
Tail Chop with LEDs in Frame.You'll need:
12V LED bulbs ($16.59): ebay auction listed as "2 AMBER SUPER REFRACTOR 24 LED LIGHT BULBS 7443 7440"
[1]Resistors ($7.95): ebay auction listed as "LED LOAD RESISTOR TURN SIGNAL BLINKER FIX 7440 7443 194"
[2]Excellent LED supplier:
http://www.superbrightleds.com/led_prods.htm [5]
Triple Grips ($1.40) - any hardware store
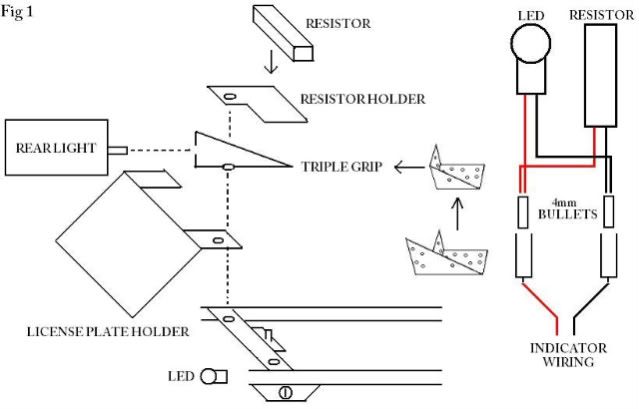
[3], (Fig 1)2 way bullets ($3.70) - you want 4mm bullets
Two LONG bolts - maybe 3cm (10 cents) (the stock ones will be too short)
Some black automotive paint ($10)
(Red) Buell Tail Light Lens (part #: Y0401A.D) ($16 AUD new)
UPDATE: in the 'book', this part's number is: Y401.9Q

Roofing Silicon ($5.00)
Part 1: Tail Chop.1. Don't cut your frame until you're sure everything you purchased works. Alternatively, get drunk & cut first, and sort it out later. dr::
2. For both the tail light holders, & license plate holder, use scrap to make mockups: this will help you get the holes just right.
3. Cut the ends off the triple grips (see Fig 1), & use your mockups as a template to drill your holes.
4. Beg/borrow/steal some aluminium scrap from a friend, and make your license plate holder. I angled mine at about 45 degrees.
5. The Buell tail light cover has a clear underside. This will illuminate your license plate with a WHITE light, which is required by law in Australia. [4]
6. The stock bolts are NOT long enough - everything made here is attached to the top of the frame (see Fig 1).
Part 2: LEDs7. Everything you could want to know re Australian vehicle standards can be found at [4]. Legal indicators are: bright, amber colored, visible through a range of 100 degrees (so the indicator CANNOT be flat).
8. LEDs.
- frame hole: 18mm diamter
- LEDs [1] : 20mm diamter
NINETEEN rear pointing LEDs was the best/brightest globe I could find (5 additional LEDs point out to the sides) [1].
9. Use a metal file to grind back the plastic casing on the LEDs to 19mm diameter - this limits the amount of metal you have to grind out of your frame.
10. Now you can cut your frame (as close to the seat lock as you dare!), and use a dremmel (or power drill) to grind back your frame until the LEDs fit. Don't overheat the frame - it will burn your paint.
11. Each LED is sealed in plastic, which is sealed into the baseplate. However, there are some small gaps between the LEDs. Fill them with clear silicon seal - just squirt it in there. It may not be necessary, but I'm paranoid. Also, while you're at it, these LEDs have a small hole in the plastic, near the rear (see Fig 2). Cover this with insulating tape.
12. Solder some wires to the ends of the globes (each globe has two positive & negative connections on each side). Alternatively, you can just wire them up by hand - they work just as well. Don't forget to wrap the ends of the globes and wires with insulation tape - you don't want them shorting on the frame!
Part 3: Resistors13. I ride a 2002 S4. The LEDs by themselves produce so little resistance that the bike thinks a globe has blown, so the indicators flash at double speed. Annoying! Hence, I used resistors.
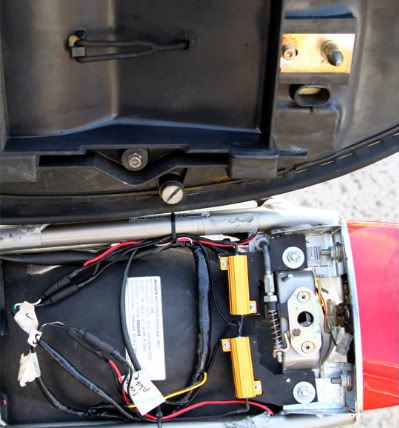
14. After 60 seconds of use, the resistors are too hot to hold [2]. I subsequently made two small 'platforms' to hold them in place. These platforms attach to the frame, so any heat generated is dissipated by 180kgs of steel (see Fig 1).
15. IMPORTANT!! There is JUST enough room for the resistors to be mounted side by side under your seat. HOWEVER, they need to be FORWARD enough so that a plastic wall on the underside of the seat doesn't sit on them.. but NOT so far forward that your tool bag is sitting on them.
16. IMPORTANT!!. The tool bag area has a plastic cover on it. To fit your resistors under the seat like this, you'll have to remove that cover. It comes off easily.
Part 4: Wiring your LEDs into your bike.17. You'll need to drill a hole in each side of your frame so that the wires from the LEDs can be connected. Each of these holes should be CAREFULLY POSITIONED.
- you don't want the wires touching your resistors - they could melt, and short.
- you don't want them on the underside of the frame, where water could be thrown up on them - don't want water in the frame!
- you can't put them on top of the frame - don't want your seat resting on them.
18. Thread your LED wiring through the holes. I then filled the frame with silcon seal: this prevents any water that might get passed the LEDS from getting into your frame. Then apply plent of silicon sealer in the frame where the LED will sit, and on the LED itself. While you CAREFULLY slide the LED into place, CAREFULLY pull on the LED wiring, to take up the slack. LOTS of silicon sealer will ooze out from around the LED - clean that up with turpetine.
The silicon sealer will hold the LEDs in place, and prevent water from getting into your frame. Also, as an added bonus, it dulls down vibrations, which should help prevent the soldered connections from breaking.
19. Paint the holes you drilled in your frame. Once dry, seal the holes with silicon.
20. All of your bike wiring will be secured in one plastic sleeve. Tease out the components as best you can e.g. indicators, license plate light, brake light.
21. Wire your LEDs as per Fig 1 - LED +'ve and resistor into ONE 4mm bullet, LED -'ve and resistor into ONE 4mm bullet. Now you can just plug them into the 4mm receptor that is your stock ducati connection!
22. The license plate light won't be needed. Cut each of the two wires (yellow, black) and fit a 4mm bullet on the end of each pair. Then insulate the bulletted wires on your bike to prevent shorts. If you ever want to use your license plate light later, you can just plug it back in!
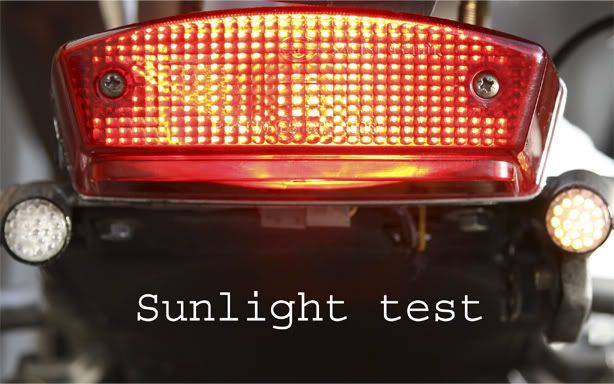
Part 5: System Test23. In the picture below, I tested the LEDs in direct sunlight. I had my girlfriend hold the brake lever on so I could compare the brake light to the LED. The red tail light plastic tends to bounce sunlight around a
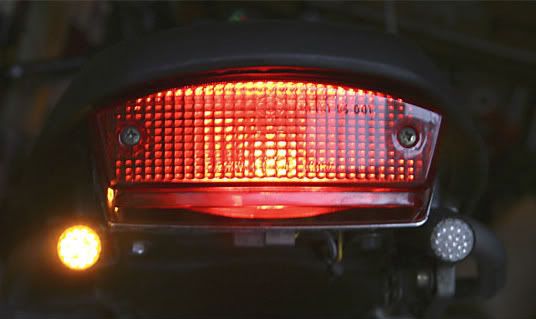
lot - so the photo below does not represent the true difference in brightness between the LED and tail light. The third photo (taken during overcast) is better representative of this relationship.
We can then use photoshop to compare the LED average brightness to that of the that of the brake light.
LED: 251 median value
Brake Light: 139 median value
The LED is 1.82 times brighter than the stock brake light. HOWEVER, you have to remember the LED is six times smaller than the standard indicator.. so it's TOTAL brighness is less than that of the stock ducati indicator. However, while the total brightness is less, the 'flashing' registers as movement to the human eye, and makes it very visible.
Web Links.[1] LEDs - purchased on EBay from VLEDs:
http://stores.ebay.com/V-LEDS[2] Resistors on Ebay:
http://cgi.ebay.com/ebaymotors/ws/eB...m=290156881084[3] Triple Grips:
http://www.nbraust.com.au/images/triple-bk.gif[4] Vehicle Standards for Australia:
http://www.comlaw.gov.au/comlaw/Legi...9?OpenDocument[5] Thanks to flsurfdog for tracking down this site - it's fantastic.