|
bigiain
|
 |
« Reply #15 on: August 06, 2009, 05:51:48 PM » |
|
Try PM-ing SydMonster - he got one welded in when he built this:  (I don't have any pics that show it though...) big |
|
|
|
|
 Logged
|
|
|
|
|
MotoCreations
|
|
« Reply #16 on: August 06, 2009, 05:55:53 PM » |
|
Since you are using the stock frame... add a tube left/right where the bend starts in the top tube at the front. This was removed for the airbox when the frame was modified from 851 spec. I typically add small gussets behind the steering tube as well (top / bottom).
The one major area of weakness given your frame modifications so far is the top main tube at the crosspoint between the two engine bolts. (normal x-location) Most of the front suspension (up/down travel) will cause deflection in this area about the front suspension bolt. (think fulcrum) Deflection is actually measureable on the older carbie frame -- newer ST-based frames are better.
One of the few things you will see with loose engine bolts (most typically when frame sliders improperly installed/torqued) is with the slight rotation/twisting allowed in this scenario, you will see cracks in the x-brace area eventually along the HAZ areas. Thus why I will gusset this area to prevent deflection on a stock frame as well to disperse the load points.
Everybody has their opinions here though. Do what you think is best!
|
|
|
|
|
Logged
|
|
|
|
|
truckinduc
|
|
« Reply #17 on: August 06, 2009, 06:18:17 PM » |
|
Yep. I realized that as a weak point in the stock design. As soon as I can get my hands on some 1/8 inch 4130 Im going to build some gussets.
I built my lower subframe mount today. All it does is join the rear motor mounts above the tranny. Doesnt do anything to aid the rigidity of the frame, just provides a good place for a lower subframe mount.
|
|
|
|
|
Logged
|
|
|
|
|
truckinduc
|
|
« Reply #18 on: August 06, 2009, 06:28:56 PM » |
|
|
|
|
|
|
Logged
|
|
|
|
|
monsta
|
|
« Reply #19 on: August 09, 2009, 01:07:32 PM » |
|
I'm also planning on bracing the frame some time soon. heres some pics that I saved for ideas...  this is one of the older 851 frames  and frame bracing with filters  |
|
|
|
|
Logged
|
93 M900 - 07 ST3 - 00 748s trackbike - 78 900SS - 13 848 EVO Corse SE
|
|
|
|
kopfjäger
|
|
« Reply #20 on: August 09, 2009, 01:26:35 PM » |
|
and frame bracing with filters Nice  |
|
|
|
|
Logged
|
“Woohoohoohoo! Two personal records! For breath holding and number of sharks shot in the frickin\\\\\\\\\\\\\\\\\\\\\\\\\\\\\\\\\\\\\\\\\\\\\\\\\\\\\\\\\\\\\\\\\\\\\\\\\\\\\\\\\\\\\\\\\\\\\\\\\\\\\\\\\\\\\\\\\\\\\\\\\\\\\\\\\\\\\\\\\\\\\\\\\\\\\\\\\\\\\\\\\\\\\\\\\\\\\\\\\\\\\\\\\\\\\\\\\\\\\\\\\\\\\\\\\\\\\\\\\\\\\\\\\\\\\\\\\\\\\\\\\\\\\\\\\\\\\\\\\\\\\\\\\\\\\\\\\\\\\\\\\\\\\\\\\\\\\\\\\\\\\\\\\\\\\\\\\\\\\\\\\\\\\\\\\\\\\\\\\\\\\\\\\\\\\\\\\\\\\\\\\\\\\\\\\\\\\\\\\\\\\\\\\\\\\\\\\\\\\\\\\\\\
|
|
|
|
Travman
|
|
« Reply #21 on: August 09, 2009, 03:53:18 PM » |
|
Beautiful. I should frame that picture and put it on my wall. That is my kind of art. I might have to erase the bag in the background first. |
|
|
|
|
Logged
|
|
|
|
|
monsta
|
|
« Reply #22 on: August 10, 2009, 03:27:31 AM » |
|
this is where the frame lives, I dont know where I got the pics from but probably from TOB. this bike has an aggressive stance! its the look I'm after... 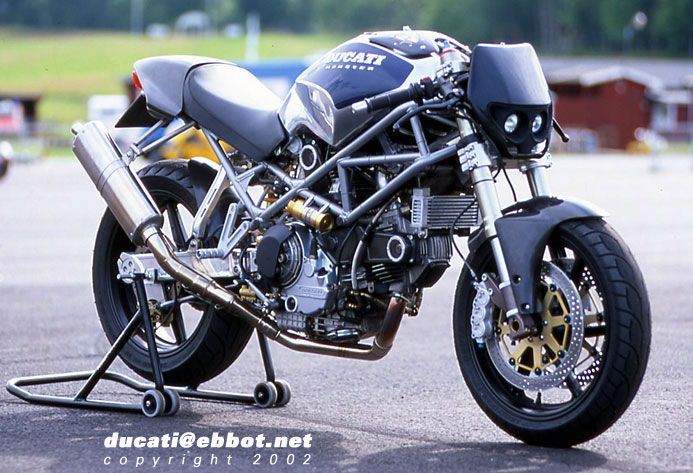 |
|
|
|
|
Logged
|
93 M900 - 07 ST3 - 00 748s trackbike - 78 900SS - 13 848 EVO Corse SE
|
|
|
|
ProTeal55
|
|
« Reply #23 on: August 10, 2009, 08:23:59 AM » |
|
Always loved that bike above... |
|
|
|
|
Logged
|
|
|
|
|
kopfjäger
|
|
« Reply #24 on: August 10, 2009, 09:36:44 AM » |
|
|
|
|
|
« Last Edit: August 10, 2009, 09:39:16 AM by kopfjager »
|
Logged
|
“Woohoohoohoo! Two personal records! For breath holding and number of sharks shot in the frickin\\\\\\\\\\\\\\\\\\\\\\\\\\\\\\\\\\\\\\\\\\\\\\\\\\\\\\\\\\\\\\\\\\\\\\\\\\\\\\\\\\\\\\\\\\\\\\\\\\\\\\\\\\\\\\\\\\\\\\\\\\\\\\\\\\\\\\\\\\\\\\\\\\\\\\\\\\\\\\\\\\\\\\\\\\\\\\\\\\\\\\\\\\\\\\\\\\\\\\\\\\\\\\\\\\\\\\\\\\\\\\\\\\\\\\\\\\\\\\\\\\\\\\\\\\\\\\\\\\\\\\\\\\\\\\\\\\\\\\\\\\\\\\\\\\\\\\\\\\\\\\\\\\\\\\\\\\\\\\\\\\\\\\\\\\\\\\\\\\\\\\\\\\\\\\\\\\\\\\\\\\\\\\\\\\\\\\\\\\\\\\\\\\\\\\\\\\\\\\\\\\\\
|
|
|
|
truckinduc
|
|
« Reply #25 on: August 13, 2009, 08:11:03 PM » |
|
welded in the first brace today. This one does nothing for rigidity of the frame, just supplies me with a mounting location for my subframe  |
|
|
|
|
Logged
|
|
|
|
|
MotoCreations
|
|
« Reply #26 on: August 13, 2009, 09:55:29 PM » |
|
Two things:
Check fitment of the engine mount location spuds -- not uncommon to see twisting / movement if you didn't have bolted tightly to a chassis jig or engine case. (even then you sometimes get misalignment) Easier to fix now then later.
Also given the brace going across there that you welded in, I'm assuming you are doing a custom rear header then for your exhaust system? ie: you plan on building one from scratch. The factory rear header and all aftermarket ones probably won't clear that tube.
One of the big things about modifying frames that most people forget about is wiring harness routing, exhaust routing, suspension linkage, fuel line routing, etc. It's the little stuff that actually consumes the most time in the end. Building the frame itself is easy -- it's getting everything to fit within it which is the challenge! Thus don't forget that stuff...
note: I like to make small half-loop connectors (think exhaust extension spring wire tabs or small machined tabs) that attach to the inner frame rails so no bandaids/tie-wraps/etc are needed on the frame rails themselves. Easy modification to make before paintwork/powdercoating takes place to help hide wiring harness later.
|
|
|
|
|
Logged
|
|
|
|
|
Ducatl
|
|
« Reply #27 on: August 14, 2009, 09:37:34 AM » |
|
I'm interested to see this unit pro-link setup, where is the attachment point for the lower dogbone going to be?
|
|
|
|
|
Logged
|
|
|
|
|
TAftonomos
|
|
« Reply #28 on: August 14, 2009, 11:04:18 AM » |
|
note: I like to make small half-loop connectors (think exhaust extension spring wire tabs or small machined tabs) that attach to the inner frame rails so no bandaids/tie-wraps/etc are needed on the frame rails themselves. Easy modification to make before paintwork/powdercoating takes place to help hide wiring harness later.
Excellent idea! |
|
|
|
|
Logged
|
|
|
|
|
truckinduc
|
|
« Reply #29 on: August 14, 2009, 06:56:14 PM » |
|
Two things:
Check fitment of the engine mount location spuds -- not uncommon to see twisting / movement if you didn't have bolted tightly to a chassis jig or engine case. (even then you sometimes get misalignment) Easier to fix now then later.
That is a good point. I welded as much of the tube as I could with the frame bolted to the engine. But due to the location that was only the upper half of each joint. Each mount twisted slightly but I have corrected it. Im not (yet) a good enough welder to know where each weld pass will "draw" the material too.
Also given the brace going across there that you welded in, I'm assuming you are doing a custom rear header then for your exhaust system? ie: you plan on building one from scratch. The factory rear header and all aftermarket ones probably won't clear that tube.
Stock will not clear the tube for sure, Im not sure about aftermarket. Doesnt matter though cause ive already started on a custom exhaust. Its going to curve upward for about 20 degrees then back downwards like normal. Ehaust tubing is 16 gauge 304 stainless. Its heavy but will do for now. Plus it was sort of cheap. Later down the road I may duplicate it in Ti once I have the money and a chamber
One of the big things about modifying frames that most people forget about is wiring harness routing, exhaust routing, suspension linkage, fuel line routing, etc. It's the little stuff that actually consumes the most time in the end. Building the frame itself is easy -- it's getting everything to fit within it which is the challenge! Thus don't forget that stuff...
note: I like to make small half-loop connectors (think exhaust extension spring wire tabs or small machined tabs) that attach to the inner frame rails so no bandaids/tie-wraps/etc are needed on the frame rails themselves. Easy modification to make before paintwork/powdercoating takes place to help hide wiring harness later.
Yes that is a very good suggestion, thanks. I plan on cutting up the stock harness and simplifying it a bit.
Also Ill be cutting the stock bottom rear out of the fuel tank. Ill have to figure out where the fuel petcock will go in order for easy hinging of the tank.
|
|
|
|
|
Logged
|
|
|
|
|


