Ducati Monster Forum

powered by:

January 04, 2025, 11:12:56 PM *
Welcome, Guest. Please login or register.

Login with username, password and session length
News: Tapatalk users...click me
 
   Home   Help Search Login Register  


Pages: [1]   Go Down
  Print  
Author Topic: How to fix your broken horn switch  (Read 14052 times)
Timmy Tucker
Hero Member
*****
Offline Offline

Posts: 702


Banninated


« on: February 16, 2011, 10:58:01 AM »

If you've ever dropped your bike, chances are you now have a stuck horn switch. Instead of forking out $200+ for new oem switchgear or trying to fit an aftermarket piece, in 20 minutes you can repair the one you have. I realize that some people are hesitant to work on anything electric, but this is probably one of the easiest repairs you can do. This can actually be done without unhooking the wiring connector from the bike (which is a bit of a pain), I removed it to make it easier to take pics. Also have a way to keep up with the tiny parts. The only tool you should need is a #1 phillips screwdriver. You may also want a second set of hands to hold the top half of the switch unit out of the way while you are working.

Caveat: The pics are from a '99 750. Your bike may differ.


1. First you need to remove the switch housing from the bike. Sorry, no pic of this step. It's just 2 phillips screws in the underside of the unit.
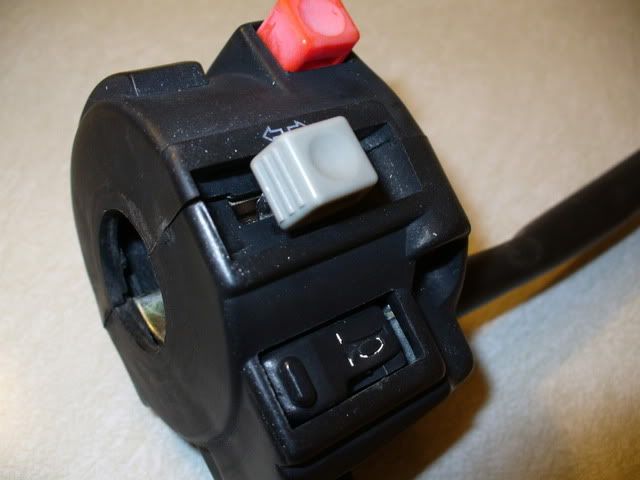


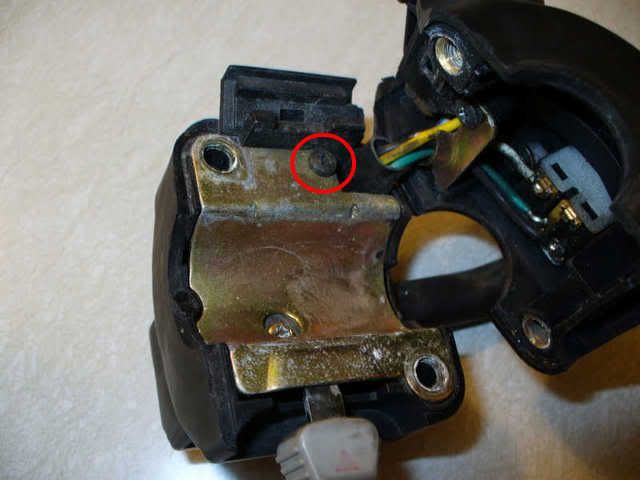
2. Here's what you will be looking at. Remove the screw circled in red and the plate it's holding down to gain access to the lower switches.


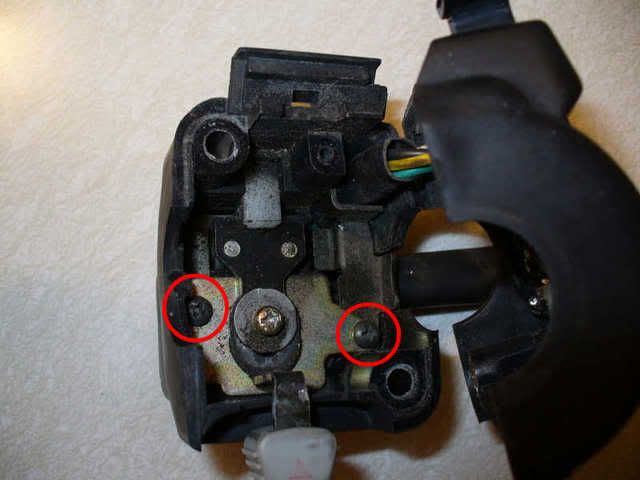
3. Next, remove the 2 screws circled in red and the turn signal switch will come out in 1 piece as pictured below. Do not remove the gold screw in the center, it's not necessary. Pay attention to how the turn signal lever interlocks with the white plastic part of the switch. This will be important during reassembly.


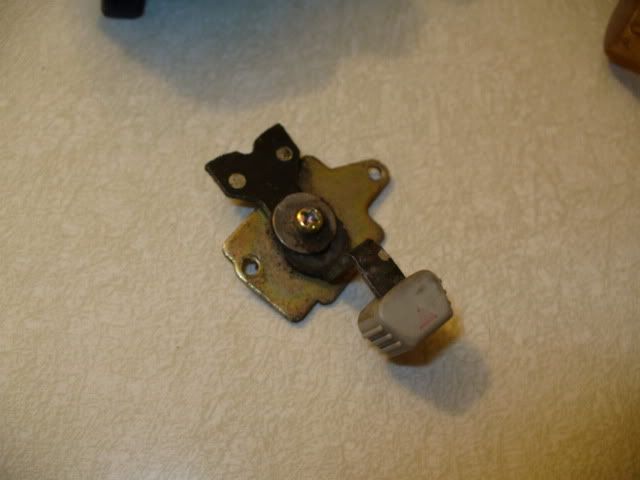
This comes out as one piece. Notice the detent at the end of the lever:


4. Here's the bits you're looking for. Loosen the screw circled in red 2-3 turns, there's no need to take it out. Simply rotate the switch back where it goes with a screwdriver. Tighten screw back up pretty snug, but be sure not to strip it out.
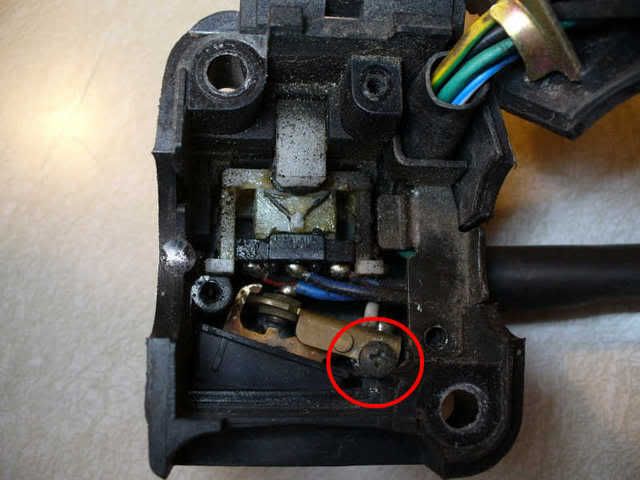


5. Here's the end result.  
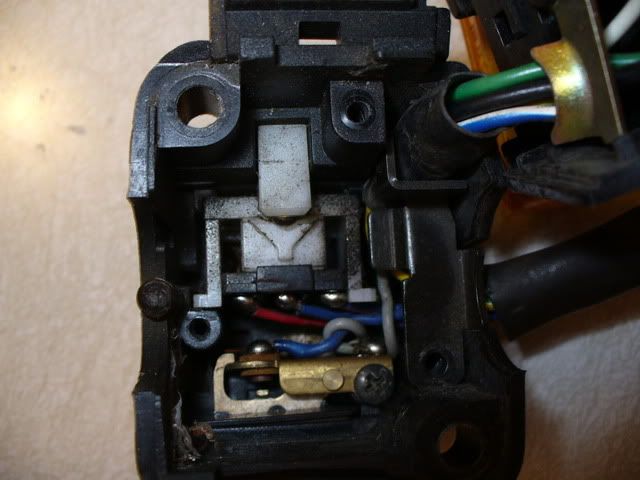


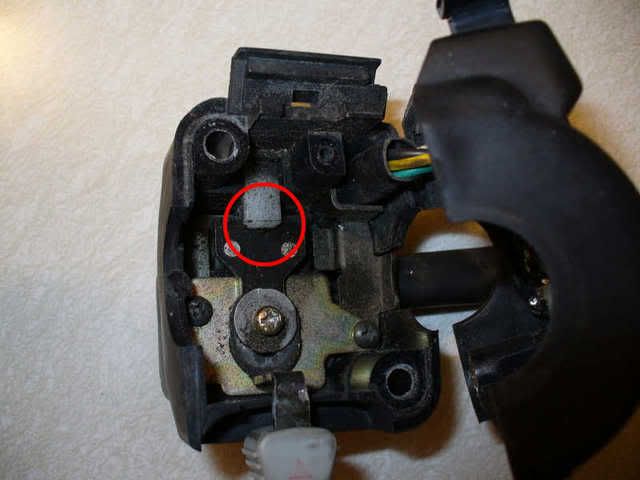
6. Re-assembly is simply these steps in reverse. Again, make sure you keep track of what goes where as some of the screws are different sizes. The only thing to watch for is installation of the turn signal switch. There is a detent in the end of the turn signal switch lever (you can see it in the 2nd pic for step 3). There is a corresponding slot and ball bearing in the white piece circled in red below. Just like making sexy time, be sure you place tab A into slot B. If you don't the turn signals won't work correctly.


There you go. If you have any questions or problems, feel free to ask away.
« Last Edit: February 16, 2011, 11:07:59 AM by Timmy Tucker » Logged

1999 M750 - "Piggy"
2007 S4RS
live2ride
Sr. Member
****
Offline Offline

Posts: 256


monster 750 dark


« Reply #1 on: February 27, 2011, 02:06:45 AM »

just a note.  i fixed this on my bike some time ago, then had to repeat it again in a month.  i realized the screw holding the piece you moved between picture 4 and picture 5 (aka the button contact switch) wasn't holding it down well enough.  I decided to shove some pieces of electrical tape between the blue and red wire in pic 5 so the button cannot be pushed back. 
Logged
Timmy Tucker
Hero Member
*****
Offline Offline

Posts: 702


Banninated


« Reply #2 on: February 28, 2011, 06:22:10 AM »

I decided to shove some pieces of electrical tape between the blue and red wire in pic 5 so the button cannot be pushed back. 

That crossed my mind, and I actually made a plastic shim to put in there, but in the end I decided against it. I was more concerned that permanent damage to the switchgear might occur if it whacked the tank hard again. I'd rather have to take it apart again than buy a $220 switch. Electrical tape seems like a safe bet since it would give with enough force. That said, it's been over a month since I fixed it and haven't experienced any unwanted movement from the switch at all.
Logged

1999 M750 - "Piggy"
2007 S4RS
mmarell
New Member
*
Offline Offline

Posts: 25


« Reply #3 on: March 16, 2011, 02:26:39 AM »

I can actually confirm the procedure!
On my way to the TT in Assen, The Netherlands, some a-hole tried nearly pushed me of the road while trying to overtake a truck (didn't see coming on the left lane).
I honked so violently that the switch got stuck in the process  laughingdp
I had to stop and disconnect the leads to the horn, for the last couple of the kilometers to the campsite [moto]
Logged

Often wrong, never unsure...
Ducatamount
Hero Member
*****
Offline Offline

Posts: 1153


« Reply #4 on: April 07, 2012, 07:48:10 AM »

Thanks,I checked this out before fixing mine (2001 M900S) and my switch was the same.I also did the folded wad of electrical tape,hopefully it won't happen again.I would just add that there is a little node on the bottom half of the assembly that has to fit in a hole on the handlebars when fitting the two halves back together.
Logged

half fast
He Man
Post Whore
******
Offline Offline

Posts: 11598


WWW
« Reply #5 on: April 12, 2012, 04:54:23 PM »

same thing happened to my bike, the screw wouldnt hold it in place anymore, so i just extended the nub by adding a few dabs of solder on it.
Logged

2006 Ducati S2R1100 Yea.... stunttin like my daddy CHROMED OUT 1100!!!!


Check out my Latest Video! 05/13/2017 :https://www.youtube.com/watch?v=P4xSA7KzEzU
patrickmccabe
New Member
*
Offline Offline

Posts: 6


« Reply #6 on: April 27, 2012, 10:36:09 AM »

great write up on this problem... my horn had not worked for years;
to be honest it scared me once I got it working. I used a chunk of
rubber to help  hold it in place.

Thank you!!!
Logged
hankrecor
New Member
*
Offline Offline

Posts: 10


WWW
« Reply #7 on: September 14, 2014, 04:58:06 AM »

This post was exactly what I was looking for and needed to fix my same problem.

Thank you for taking the time to document the process and clearly with noted photos.

Much appreciated.
Logged

Hank
---------------------------------------
2001 M750
stonemaster
Guest
« Reply #8 on: September 20, 2014, 03:44:31 AM »

apparently this must be a prevalent issue, I have problems with my horn, will definitely try this out, thanx
Logged
jduke
Full Member
***
Offline Offline

Posts: 128


« Reply #9 on: December 02, 2014, 11:50:11 AM »

I had the same problem, I owe Timmy Tucker a cold beer or three, THANKS!!
When I first tightened the screw I tested it before buttoning everything up. I noticed the switch moved so I tightened it up some more but it still didn't feel solid.
I pushed the switch from the inside pretty hard and felt it snap into place. I almost thought I had pushed it completely out of the housing, but didn't. I tightened the screw and everything is solid.
I might be proved wrong after using it a few times but I feel you guys didn't push the switch from the inside hard enough to snap it back into place.
But no matter what, like live2ride said, this fix is a hell of a lot cheaper than a $220+ switch...
Logged
SaintP
New Member
*
Offline Offline

Posts: 1


« Reply #10 on: February 09, 2015, 04:19:31 AM »

Hi/Lo Beam button in upper half of same unit sticks in Hi position. With a little fiddling will unstick but not something that can be done while riding. Any suggestions as to how to repair?
Logged
jduke
Full Member
***
Offline Offline

Posts: 128


« Reply #11 on: March 27, 2015, 10:40:35 AM »

Easy enough to take apart and look for anything loose or interfering with switch. Lube it and work it while apart and you'll probably fix it.
Logged
Pages: [1]   Go Up
  Print  
 
Jump to:  


Powered by MySQL Powered by PHP Powered by SMF 1.1.21 | SMF © 2015, Simple Machines
Simple Audio Video Embedder
Valid XHTML 1.0! Valid CSS!
SimplePortal 2.1.1