Ducati Monster Forum

powered by:

February 24, 2025, 08:20:56 PM *
Welcome, Guest. Please login or register.

Login with username, password and session length
News: Please Help
 
   Home   Help Search Login Register  


Pages: [1]   Go Down
  Print  
Author Topic: Sv650 carb help  (Read 5781 times)
Charlief
Hero Member
*****
Offline Offline

Posts: 849


« on: August 05, 2010, 06:34:58 AM »

I posted on svrider but got no answers.

Maybe someone here can help

This is just cut and pasted from svrider
So I read all the pages regarding the Gen 1 carbs.  I read the recomended jetting pages.  And now I have just enough knowledge to be dangerous.

Bike is a 02 SV650S track bike

Stock motor....stock pipe....and the wiring is bare bones for track use only...no TPS. no fans... etc

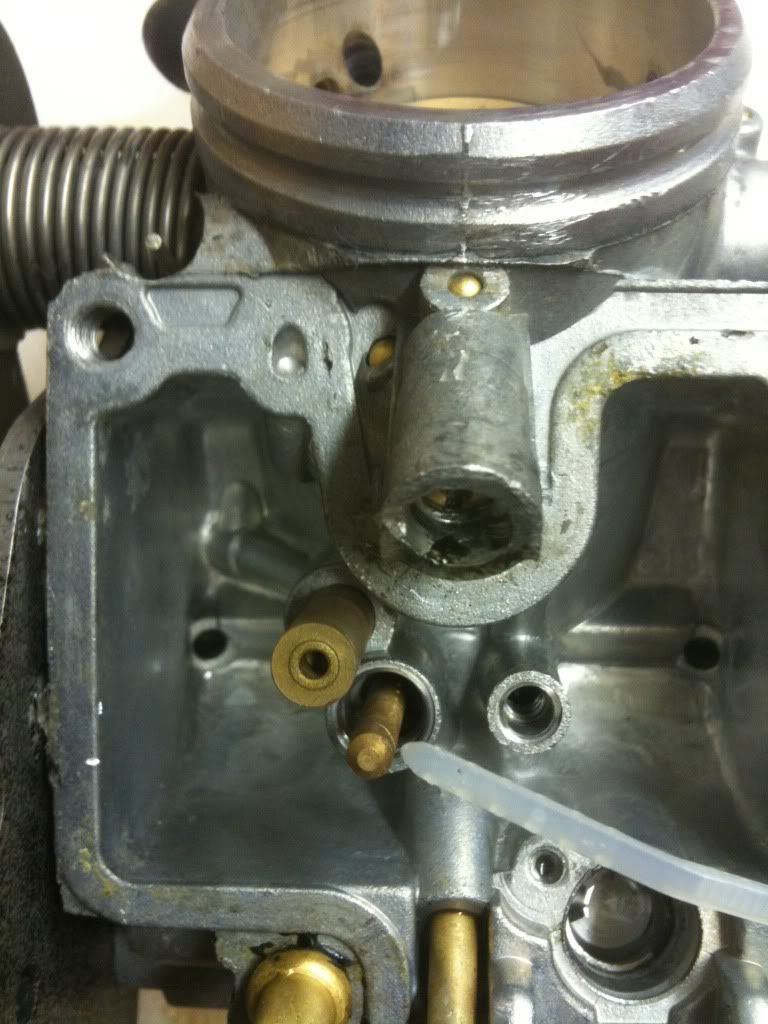
I took the carbs apart and cleaned every passage so I have good flow every where using parts cleaner and air.  I got new jets 17.5 replacing 15 that are in there.  Hoping to have them not clog up as often as suggested here.

 FYI the 15 I took out have that groove.  The new 17.5 do not.  I wonder if this will be a problem?

I got the rebuild kits and I know the large round O ring is not used. What is the smaller O ring used for?


How would one remove the mains? I'm assuming this is the main where the zip tie is pointing to....I unscrewed the holder.  I have very good flow after cleaning.  But just for future reference would like to know how they are replaced.


The bosses for the air/fuel screw have already been drilled out and were set at 2.5 turns out.

What is meant when you guys say you used shims under the needle?

Whats the purpose of this?


How do you set float level?  And What exactly are you looking for when setting height? Is this something done with an aftermarket kit? 

I'm sorry for the newb questions.  I am very mechanical (rebuilt my Ducati S2R over the winter) but know nothing about carbs. 

I'm sure I'll have a few more questions as I go along. 

Thank you

Charlie

ps.  I already hurt myself...yanking the carbs off my hand slipped and I smacked my nose...giving me a nose bleed.  It's a good start!
Logged

Ddan
Some of my best friends are whores
Hero Member
*****
Offline Offline

Posts: 9086


« Reply #1 on: August 05, 2010, 10:17:07 AM »

I got nothing for you on the carbs, but I'm curious about the coil/cdi.  Was that part of the problem, or a red herring?
Logged

2000 Monster 900Sie, a few changes
1992 900 SS, currently a pile of parts.  Now running
                    flogged successfully  NHMS  12 customized.  Twice.   T3 too.   Now retired.
 
Ducati Monster Forum at
www.ducatimonsterforum.org
Charlief
Hero Member
*****
Offline Offline

Posts: 849


« Reply #2 on: August 05, 2010, 01:53:30 PM »

I got nothing for you on the carbs, but I'm curious about the coil/cdi.  Was that part of the problem, or a red herring?


Hey Dan,

THANKS FOR NOTHING!!!

I'm thinking it's junk inthe carbs. When I took the float pin guide out there was a lot of sediment in there.  I got some new plugs and my spark came back to normal.  It would die with any throttle input. I did score a cdi box just to have an extra.

I'm away fri, sat, and Sunday so I'll work on it again next week.
Logged

vaclav
Full Member
***
Offline Offline

Posts: 139


« Reply #3 on: August 05, 2010, 02:04:38 PM »

Mains means main jets. Is that the jets you already replaced? If not it was the pilot jets. Take the tops off your carbs (carefully - there is a spring in there). Inside each you will find a rubber diaphragm with a piece of metal in the middle. Carefully lift that little piece of metal out. That is the needle. You will see an e-clip on it which sets the height of that needle in the diaphragm. Put your shims under that clip but above the diaphragm. The goal is to make that needle sit a little higher in the diaphragm thereby permitting more fuel flow. The hole that that needle slides down into leads directly to the main jet in the float bowl. That should help you find it no problem. Setting the float height requires attaching clear tubing to the drain hole in the float bowl and curling it up towards the top. That way when you turn the fuel on you can see what level it is sitting at in the float bowl. If it is not right then you take the bowl off and bend the little tang that the plastic float attaches to to change the height at which the fuel feed hole gets closed.

I used to race an SV and I don't think I made those particular changes until I had a more free-flowing system (aftermarket exhaust and filters) but it has been many years so I could be wrong. I do remember for sure that I did not have to change my float height when I did those mods. I would save that for last and test ride it first because it easy to get into a pickle messing with the float height. Hope that helps.
Logged
Ddan
Some of my best friends are whores
Hero Member
*****
Offline Offline

Posts: 9086


« Reply #4 on: August 05, 2010, 02:14:06 PM »


Hey Dan,

THANKS FOR NOTHING!!!

I'm thinking it's junk inthe carbs. When I took the float pin guide out there was a lot of sediment in there.  I got some new plugs and my spark came back to normal.  It would die with any throttle input. I did score a cdi box just to have an extra.

I'm away fri, sat, and Sunday so I'll work on it again next week.
You know I'm happy to do my bit Charlie     Grin
Logged

2000 Monster 900Sie, a few changes
1992 900 SS, currently a pile of parts.  Now running
                    flogged successfully  NHMS  12 customized.  Twice.   T3 too.   Now retired.
 
Ducati Monster Forum at
www.ducatimonsterforum.org
Charlief
Hero Member
*****
Offline Offline

Posts: 849


« Reply #5 on: August 05, 2010, 03:15:17 PM »

Mains means main jets. Is that the jets you already replaced? If not it was the pilot jets.

I replaced the pilot jets.  I unscrewed the holder for the main but don't know how to remove the main.. Not that I need to do it now ... just for future reference.

Take the tops off your carbs (carefully - there is a spring in there). Inside each you will find a rubber diaphragm with a piece of metal in the middle. Carefully lift that little piece of metal out. That is the needle. You will see an e-clip on it which sets the height of that needle in the diaphragm. Put your shims under that clip but above the diaphragm. The goal is to make that needle sit a little higher in the diaphragm thereby permitting more fuel flow. The hole that that needle slides down into leads directly to the main jet in the float bowl. That should help you find it no problem.

Ok that sounds pretty straight forward.

Setting the float height requires attaching clear tubing to the drain hole in the float bowl and curling it up towards the top. That way when you turn the fuel on you can see what level it is sitting at in the float bowl. If it is not right then you take the bowl off and bend the little tang that the plastic float attaches to to change the height at which the fuel feed hole gets closed.

I used to race an SV and I don't think I made those particular changes until I had a more free-flowing system (aftermarket exhaust and filters) but it has been many years so I could be wrong. I do remember for sure that I did not have to change my float height when I did those mods. I would save that for last and test ride it first because it easy to get into a pickle messing with the float height. Hope that helps.

I think I'll leave the float height alone.

Thanks for the info...now I'm a little less confused.

Charlie
« Last Edit: August 05, 2010, 03:53:07 PM by Charlief » Logged

vaclav
Full Member
***
Offline Offline

Posts: 139


« Reply #6 on: August 06, 2010, 12:38:32 PM »

Here is a good tutorial...

http://www.sebei.co.cc/catpoopman/sv650_rejet.html

Also consider "desnorkeling" and "tank shimming"!
« Last Edit: August 06, 2010, 12:40:42 PM by vaclav » Logged
Charlief
Hero Member
*****
Offline Offline

Posts: 849


« Reply #7 on: August 07, 2010, 11:41:24 AM »

Here is a good tutorial...

http://www.sebei.co.cc/catpoopman/sv650_rejet.html

Also consider "desnorkeling" and "tank shimming"!

Those links have a ton of info!!!! Thanks!!!
Logged

671M900
Sr. Member
****
Offline Offline

Posts: 378


« Reply #8 on: November 03, 2010, 09:27:21 AM »

I'm not really a good judge of size, but there are two possibilities for the oring, at least for mikunis. The airscrews may have a spring with a washer and oring under it, or the float bowl drain screws might have an oring as a gasket. This is just a guess as that's what the smaller orings are usually for.

« Last Edit: November 03, 2010, 09:29:01 AM by 671M900 » Logged

671ducati.wordpress.com Record of Progress!
Ahks
Modest with his
Sr. Member
****
Offline Offline

Posts: 286


« Reply #9 on: November 03, 2010, 09:41:17 AM »

the pics brought back the nightmares from rebuilding the rack of 4 mikuni's on my yamaha xj600... i've started sweating a little bit. I can't wait to sell this make the beast with two backsing thing... I'm good with electronics and am good at troubleshooting eletrical systems. I like efi with all it's sensors and gadgets.
Logged
Pages: [1]   Go Up
  Print  
 
Jump to:  


Powered by MySQL Powered by PHP Powered by SMF 1.1.21 | SMF © 2015, Simple Machines
Simple Audio Video Embedder
Valid XHTML 1.0! Valid CSS!
SimplePortal 2.1.1